
Hope

Disturbed

Cluster made using Back 2 Black PTU scrapkit - BiBi's Kit
Or a color of choice from tube or cluster frame.
the bottom of the tube. That you do not
Starrified

CTRL+D Close out original Template.
on the blue inner rectangle
Selections - Select all - Float - Defloat
Selections - Modify - expand by 1
Copy and paste your tube as a new layer.
Selections - Invert - Hit delete on your keyboard.
load the following settings
0 - 0 - 30 - 6.00 - Black.
Copy and paste any other elements that you may wish to use,
remembering to add a drop shadow to each layer.
Use my finished tag as a guide for placement of embelishments.
OPTIONAL FILTER
On your tube layer load the following effect
Xero Porcelain.
You don't have to add this effect.
Mess with the settings until you are happy.
or load with the following settings.
50 - 128 - 128 - 0 - 0 - 255.
Add any other embelishments of your choice,
Either use the same as i have or any will work with the same effect,
Remember to add a drop shadow to each layer.
Add any other names and copyrite information that is required,
Save as you would normally.
Thats it tutorial complete. Use my finished result as a reference.
This tutorial was written by DigiMania Scraps
Any resemblance to any other tutorial is purely coincidental
All tutorials are registered at Tutorial Writers Inc.
Family Tradition
 Tutorial will be posted here shortly!
Broken Dreams
 Program of choice is pspX2
This tutorial was written for those
that have a working knowledge of PSP.
-----------------------------------------
Supplies Needed
Tube/Image of choice – Steve Baier - Upyourart
You will need a license to use this tube
Scrap kit of choice – Broken Dreams
Available to purchase at - Foxy Designs
Template of choice – Template 1 - Babe's DesignzWeeScottsLass
Filter - Xero Porcelain -OPTIONAL
Font used – Bank Gothic
-----------------------------------------
-Lets Get Started-
Open a template of choice i used Template 1
Close off the Credits,
Copy and paste a paper of choice,
I used paper1
Layers, Load/save mask from disc,
Load with the following settings
Source Luminance, Fit to canvas, Hide all mask - Load
Merge Group.
On your Template fill each section with your papers of choice.
I used several different papers for this,
Add drop shaddow 2 2 on each section,
Select the Circle layer,
Selections, Select all float defloat,
Copy and plaste your tube as a new layer and place as you wish
or as i have, See finished guide as a referance.
I also applied the Xero-porcelain filter
50 - 128 - 128 - 0 - 0 - 255 - ok.
Open another tube of choice resize,
copy and paste into the frames layer add drop shaddow 2 2.
I used the Porcelain effect
Loaded with the following settings
50 - 128 - 128 - 0 - 0 - 255 - ok.
Add your elements of choice.
Add drop shaddow 2 2
To all of these layers,
I used several Different elements from thsi wonderful kit
so many different elelemnts to play with
You can use the same as i did.
You can also place in the same places i have,
Use my finished result as a referance.
This tutorial was written by DigiMania Scraps
Any resemblance to any other tutorial is purely coincidental
All tutorials are registered at Tutorial Writers Inc.
Remember to add the same previously used
dropshadow to each of the layers,
Add any other names and copyrite information that is required,
Save as you would normally.
Thats it tutorial complete.
Program of choice is pspX2
This tutorial was written for those
that have a working knowledge of PSP.
-----------------------------------------
Supplies Needed
Tube/Image of choice – Steve Baier - Upyourart
You will need a license to use this tube
Scrap kit of choice – Broken Dreams
Available to purchase at - Foxy Designs
Template of choice – Template 1 - Babe's DesignzWeeScottsLass
Filter - Xero Porcelain -OPTIONAL
Font used – Bank Gothic
-----------------------------------------
-Lets Get Started-
Open a template of choice i used Template 1
Close off the Credits,
Copy and paste a paper of choice,
I used paper1
Layers, Load/save mask from disc,
Load with the following settings
Source Luminance, Fit to canvas, Hide all mask - Load
Merge Group.
On your Template fill each section with your papers of choice.
I used several different papers for this,
Add drop shaddow 2 2 on each section,
Select the Circle layer,
Selections, Select all float defloat,
Copy and plaste your tube as a new layer and place as you wish
or as i have, See finished guide as a referance.
I also applied the Xero-porcelain filter
50 - 128 - 128 - 0 - 0 - 255 - ok.
Open another tube of choice resize,
copy and paste into the frames layer add drop shaddow 2 2.
I used the Porcelain effect
Loaded with the following settings
50 - 128 - 128 - 0 - 0 - 255 - ok.
Add your elements of choice.
Add drop shaddow 2 2
To all of these layers,
I used several Different elements from thsi wonderful kit
so many different elelemnts to play with
You can use the same as i did.
You can also place in the same places i have,
Use my finished result as a referance.
This tutorial was written by DigiMania Scraps
Any resemblance to any other tutorial is purely coincidental
All tutorials are registered at Tutorial Writers Inc.
Remember to add the same previously used
dropshadow to each of the layers,
Add any other names and copyrite information that is required,
Save as you would normally.
Thats it tutorial complete.
Fallen Angel
 SUPPLIES NEEDED
Tube/Images of choice, I am using the artwork of - Steve Baier
You need a license to use his work, Please purchase one at UpYourArt
Scrapkit used - Funky Denim made by Sophisticated Scraps
Mask used - WSL_Mask75 made by Chelle at WeeScottsLass
Filter required - Eye Candy 5 Impact
Font used - Roelandt BT
Supplies - Here
Open a blank canvas
550 x 550
floodfill with white
copy and paste a paper of choice from the kit provided,
Paste as anew layerLoad/Save mask find your mask of choice,
I am using WSL_Mask75 load with these settings,
Source luminance, Fit to canvas, Hide all mask. Hit load,
On your layers pallete right click merge as a group.
Again select a paper of choice from your kit paste as new image,
On your layers pallete change your solid colour to pattern find your selected paper,
With your preset shape tool set to eclipse, Width set at 22 Your pallete layer,
Pattern as foreground, background null. Draw out a circle in the middle of your canvas,
Once happy
DO NOT CONVERT TO RASTER LAYER YET
Go to Objects, Align centre in canvas, Now you may convert to raster layer,
Effect Eyecandy 5 Impact, Bevel with the following settings.
SUPPLIES NEEDED
Tube/Images of choice, I am using the artwork of - Steve Baier
You need a license to use his work, Please purchase one at UpYourArt
Scrapkit used - Funky Denim made by Sophisticated Scraps
Mask used - WSL_Mask75 made by Chelle at WeeScottsLass
Filter required - Eye Candy 5 Impact
Font used - Roelandt BT
Supplies - Here
Open a blank canvas
550 x 550
floodfill with white
copy and paste a paper of choice from the kit provided,
Paste as anew layerLoad/Save mask find your mask of choice,
I am using WSL_Mask75 load with these settings,
Source luminance, Fit to canvas, Hide all mask. Hit load,
On your layers pallete right click merge as a group.
Again select a paper of choice from your kit paste as new image,
On your layers pallete change your solid colour to pattern find your selected paper,
With your preset shape tool set to eclipse, Width set at 22 Your pallete layer,
Pattern as foreground, background null. Draw out a circle in the middle of your canvas,
Once happy
DO NOT CONVERT TO RASTER LAYER YET
Go to Objects, Align centre in canvas, Now you may convert to raster layer,
Effect Eyecandy 5 Impact, Bevel with the following settings.
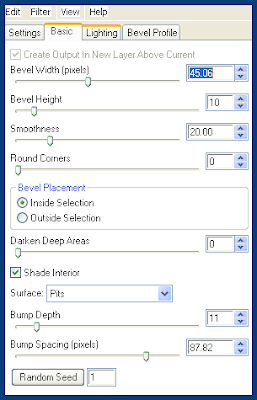
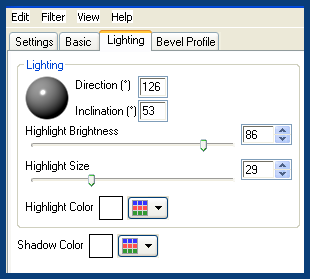 With your magic wand settings as tolerance10 feather 0
Select the centre of your frame you just made. with your tube image now paste as a new layer, once happy with placement,
Selections, Invert Hit delete on your keyboard,
Move this layer below your frame layer that you made.
Now back to the kit copy and paste the funky denim stitched ribbon,
Image, Free rotate by 90 degrees. Move this to the bottom of your frame,
See my tag as a guide. Copy and paste a flower from the kit place at the end or the start of your ribbon
See my tag as a guide. Add a dropshadow of choice to each layer except your background and mask layer
I used 3.3.50.5.black Back to the kit copy and paste the bow as a new layer,
Place on the right side of your frame,
Duplicate this layer Image mirror.
Again duplicate the layer and bring to the centre top of your frame.
Add a dropshadow again to each of these layers.
Add any names you require, and copyrite information needed.
Save as you would normally, Thats it tut complete
Thanks for trying my tutorial.
With your magic wand settings as tolerance10 feather 0
Select the centre of your frame you just made. with your tube image now paste as a new layer, once happy with placement,
Selections, Invert Hit delete on your keyboard,
Move this layer below your frame layer that you made.
Now back to the kit copy and paste the funky denim stitched ribbon,
Image, Free rotate by 90 degrees. Move this to the bottom of your frame,
See my tag as a guide. Copy and paste a flower from the kit place at the end or the start of your ribbon
See my tag as a guide. Add a dropshadow of choice to each layer except your background and mask layer
I used 3.3.50.5.black Back to the kit copy and paste the bow as a new layer,
Place on the right side of your frame,
Duplicate this layer Image mirror.
Again duplicate the layer and bring to the centre top of your frame.
Add a dropshadow again to each of these layers.
Add any names you require, and copyrite information needed.
Save as you would normally, Thats it tut complete
Thanks for trying my tutorial.
Dirty Money
 SUPPLIES NEEDED
Tube/Images of choice, I am using the artwork of - Steve Baier
You need a license to use his work, Please purchase one at UpYourArt
Dollar used - Obtained from a yahoo group
if this is yours please contact me so i can credit you
Doodle used - made by Yarrow please visit fall3nangel
Font used - TheNautiGal ROB
Supplies - Here
Open a blank canvas
550 x 550
Floodfill with white
Copy and paste the dollar as a new layer
With your magic wand, Select inside the centre of the dollar
Selections, Modify, Expand by 3Copy and paste your tube as a new layer,
Place as you would like visible. Once happy with placement
Selections, Invert, Hit delete on your keyoard.
move your tube layer below your dollar layer. Merge these to visible.
Copy and paste the doodle as a new layer Image resize by 50% Place on the top left of your doller.
Move this below your dollar layer, Add a dropshadow of choice
I used a bold dropshadow of
SUPPLIES NEEDED
Tube/Images of choice, I am using the artwork of - Steve Baier
You need a license to use his work, Please purchase one at UpYourArt
Dollar used - Obtained from a yahoo group
if this is yours please contact me so i can credit you
Doodle used - made by Yarrow please visit fall3nangel
Font used - TheNautiGal ROB
Supplies - Here
Open a blank canvas
550 x 550
Floodfill with white
Copy and paste the dollar as a new layer
With your magic wand, Select inside the centre of the dollar
Selections, Modify, Expand by 3Copy and paste your tube as a new layer,
Place as you would like visible. Once happy with placement
Selections, Invert, Hit delete on your keyoard.
move your tube layer below your dollar layer. Merge these to visible.
Copy and paste the doodle as a new layer Image resize by 50% Place on the top left of your doller.
Move this below your dollar layer, Add a dropshadow of choice
I used a bold dropshadow of
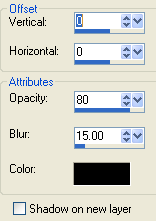 Duplicate this doodle layer Image mirror.
Again duplicate this layer, This time go to image then flip,
This should place at the bottom of the dollar. Duplicate, Image,
Mirror Back on to your dollar layer, Duplicate this a further 2 more times so you have a total of 3 dollar layers lol
BIG BUX On your first duplicate
Go to Image rotate, Free rotate, 15 degrees left
On your 2nd duplicate layer go to image, rotate, free rotate, 15 degrees right.
Bring your original layer to the top of your layers pallete.
Copy and paste a nother tube of choice and place below your dollars.
See my tag as a guide. Add a dropshadow of choice to each layer,
I used the same dropshadow as we previously used.
Add any names and copyrite information required.
Save as you would normally. Thats it tut complete
Thanks for trying my tutorial.
Duplicate this doodle layer Image mirror.
Again duplicate this layer, This time go to image then flip,
This should place at the bottom of the dollar. Duplicate, Image,
Mirror Back on to your dollar layer, Duplicate this a further 2 more times so you have a total of 3 dollar layers lol
BIG BUX On your first duplicate
Go to Image rotate, Free rotate, 15 degrees left
On your 2nd duplicate layer go to image, rotate, free rotate, 15 degrees right.
Bring your original layer to the top of your layers pallete.
Copy and paste a nother tube of choice and place below your dollars.
See my tag as a guide. Add a dropshadow of choice to each layer,
I used the same dropshadow as we previously used.
Add any names and copyrite information required.
Save as you would normally. Thats it tut complete
Thanks for trying my tutorial.All Natural
 Supplies Needed
Tube/Image of choice I am using the awsome artwork of steve baier
of which you need a license to use you can get this UpYourArt
Natural Scrapkit Scrappy Expressions Thanks Melissa
I used the doodle from a kit called Funky Denim by Lisa at Sophisticated Scraps
Suplies Here
Ok, lets Begin
Open a blank canvas
550 x 550
Floodfill with white
Copy and paste the provided mask layer as a new layer
colourise to suit your tube.
Copy and paste a paper of choice as a new layer.
Image Resize by 50% Image Rotate, Free Rotate, 45 right
Add a dropshadow of choice i added 4, 4, 50, 4.00 Black
Again choose another paper of choice colourising to suit if you wish.
Image, Resize, Resize by 50% add the same dropshadow
As you previously used. Copy and paste the frame as a new layer
again colourising to suit Image resize resize to a size you prefer Image,
Free Rotate, 45 degrees right. With your magic wans select inside the frame,
with the following magic wand settings Tolerance 10 feather 0
Selections, Modify, Expand by 3 Copy and paste your Tube/Image as a new layer
Place the part of the image/Tube you wish to be seen Inside the frame.
Selections Invert Making sure your still on your image/tube layer
hit delete on your keyboard. Move this layer below your frame.
Copy and paste the ribbon 1 as a new layer.
Place across the bottom of your frame and paper layer 2.
Add a dropshadow of choice. Once happy with placement (See my tag as a guide)
Grab your selection tool and carefully select the edges of the ribbon that are overlapping your scrap paper Hit delete on your keyboard
Repeat this step for the other side. Selections, Select None once happy.
Copy and paste the flower asa new layer again resizing and colourising to suit.
Place on 1 of your corners once happy add the same drop shadow as before.
Copy and paste the name tag as new layer placing as you wish again resizing to suit.
copy and paste the ribbon as a new layer resizing an place on top of your name tag.
With the provided doodle resize by 50% colourise to suit Place above your mask layer,
Duplicate. Image Mirror Paste as a new layer again and place towards the bottom of your tag
See my tag as a guide. See my tag as a guide.
Add all proper copyrite information and any names you desire
Save as you normally would. Thats it Tut complete
Thanks for trying my tutorial.
Supplies Needed
Tube/Image of choice I am using the awsome artwork of steve baier
of which you need a license to use you can get this UpYourArt
Natural Scrapkit Scrappy Expressions Thanks Melissa
I used the doodle from a kit called Funky Denim by Lisa at Sophisticated Scraps
Suplies Here
Ok, lets Begin
Open a blank canvas
550 x 550
Floodfill with white
Copy and paste the provided mask layer as a new layer
colourise to suit your tube.
Copy and paste a paper of choice as a new layer.
Image Resize by 50% Image Rotate, Free Rotate, 45 right
Add a dropshadow of choice i added 4, 4, 50, 4.00 Black
Again choose another paper of choice colourising to suit if you wish.
Image, Resize, Resize by 50% add the same dropshadow
As you previously used. Copy and paste the frame as a new layer
again colourising to suit Image resize resize to a size you prefer Image,
Free Rotate, 45 degrees right. With your magic wans select inside the frame,
with the following magic wand settings Tolerance 10 feather 0
Selections, Modify, Expand by 3 Copy and paste your Tube/Image as a new layer
Place the part of the image/Tube you wish to be seen Inside the frame.
Selections Invert Making sure your still on your image/tube layer
hit delete on your keyboard. Move this layer below your frame.
Copy and paste the ribbon 1 as a new layer.
Place across the bottom of your frame and paper layer 2.
Add a dropshadow of choice. Once happy with placement (See my tag as a guide)
Grab your selection tool and carefully select the edges of the ribbon that are overlapping your scrap paper Hit delete on your keyboard
Repeat this step for the other side. Selections, Select None once happy.
Copy and paste the flower asa new layer again resizing and colourising to suit.
Place on 1 of your corners once happy add the same drop shadow as before.
Copy and paste the name tag as new layer placing as you wish again resizing to suit.
copy and paste the ribbon as a new layer resizing an place on top of your name tag.
With the provided doodle resize by 50% colourise to suit Place above your mask layer,
Duplicate. Image Mirror Paste as a new layer again and place towards the bottom of your tag
See my tag as a guide. See my tag as a guide.
Add all proper copyrite information and any names you desire
Save as you normally would. Thats it Tut complete
Thanks for trying my tutorial.
All Natural
Blinkie
