Fallen Angel
 SUPPLIES NEEDED
Tube/Images of choice, I am using the artwork of - Steve Baier
You need a license to use his work, Please purchase one at UpYourArt
Scrapkit used - Funky Denim made by Sophisticated Scraps
Mask used - WSL_Mask75 made by Chelle at WeeScottsLass
Filter required - Eye Candy 5 Impact
Font used - Roelandt BT
Supplies - Here
Open a blank canvas
550 x 550
floodfill with white
copy and paste a paper of choice from the kit provided,
Paste as anew layerLoad/Save mask find your mask of choice,
I am using WSL_Mask75 load with these settings,
Source luminance, Fit to canvas, Hide all mask. Hit load,
On your layers pallete right click merge as a group.
Again select a paper of choice from your kit paste as new image,
On your layers pallete change your solid colour to pattern find your selected paper,
With your preset shape tool set to eclipse, Width set at 22 Your pallete layer,
Pattern as foreground, background null. Draw out a circle in the middle of your canvas,
Once happy
DO NOT CONVERT TO RASTER LAYER YET
Go to Objects, Align centre in canvas, Now you may convert to raster layer,
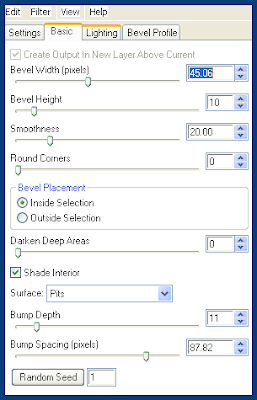
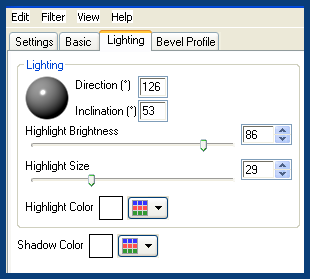
Effect Eyecandy 5 Impact, Bevel with the following settings.
SUPPLIES NEEDED
Tube/Images of choice, I am using the artwork of - Steve Baier
You need a license to use his work, Please purchase one at UpYourArt
Scrapkit used - Funky Denim made by Sophisticated Scraps
Mask used - WSL_Mask75 made by Chelle at WeeScottsLass
Filter required - Eye Candy 5 Impact
Font used - Roelandt BT
Supplies - Here
Open a blank canvas
550 x 550
floodfill with white
copy and paste a paper of choice from the kit provided,
Paste as anew layerLoad/Save mask find your mask of choice,
I am using WSL_Mask75 load with these settings,
Source luminance, Fit to canvas, Hide all mask. Hit load,
On your layers pallete right click merge as a group.
Again select a paper of choice from your kit paste as new image,
On your layers pallete change your solid colour to pattern find your selected paper,
With your preset shape tool set to eclipse, Width set at 22 Your pallete layer,
Pattern as foreground, background null. Draw out a circle in the middle of your canvas,
Once happy
DO NOT CONVERT TO RASTER LAYER YET
Go to Objects, Align centre in canvas, Now you may convert to raster layer,
Effect Eyecandy 5 Impact, Bevel with the following settings.
 With your magic wand settings as tolerance10 feather 0
Select the centre of your frame you just made. with your tube image now paste as a new layer, once happy with placement,
Selections, Invert Hit delete on your keyboard,
Move this layer below your frame layer that you made.
Now back to the kit copy and paste the funky denim stitched ribbon,
Image, Free rotate by 90 degrees. Move this to the bottom of your frame,
See my tag as a guide. Copy and paste a flower from the kit place at the end or the start of your ribbon
See my tag as a guide. Add a dropshadow of choice to each layer except your background and mask layer
I used 3.3.50.5.black Back to the kit copy and paste the bow as a new layer,
Place on the right side of your frame,
Duplicate this layer Image mirror.
Again duplicate the layer and bring to the centre top of your frame.
Add a dropshadow again to each of these layers.
Add any names you require, and copyrite information needed.
Save as you would normally, Thats it tut complete
Thanks for trying my tutorial.
With your magic wand settings as tolerance10 feather 0
Select the centre of your frame you just made. with your tube image now paste as a new layer, once happy with placement,
Selections, Invert Hit delete on your keyboard,
Move this layer below your frame layer that you made.
Now back to the kit copy and paste the funky denim stitched ribbon,
Image, Free rotate by 90 degrees. Move this to the bottom of your frame,
See my tag as a guide. Copy and paste a flower from the kit place at the end or the start of your ribbon
See my tag as a guide. Add a dropshadow of choice to each layer except your background and mask layer
I used 3.3.50.5.black Back to the kit copy and paste the bow as a new layer,
Place on the right side of your frame,
Duplicate this layer Image mirror.
Again duplicate the layer and bring to the centre top of your frame.
Add a dropshadow again to each of these layers.
Add any names you require, and copyrite information needed.
Save as you would normally, Thats it tut complete
Thanks for trying my tutorial.
Subscribe to:
Post Comments
(Atom)
Blinkie

0 comments:
Post a Comment